Configure Output from SAP Spool
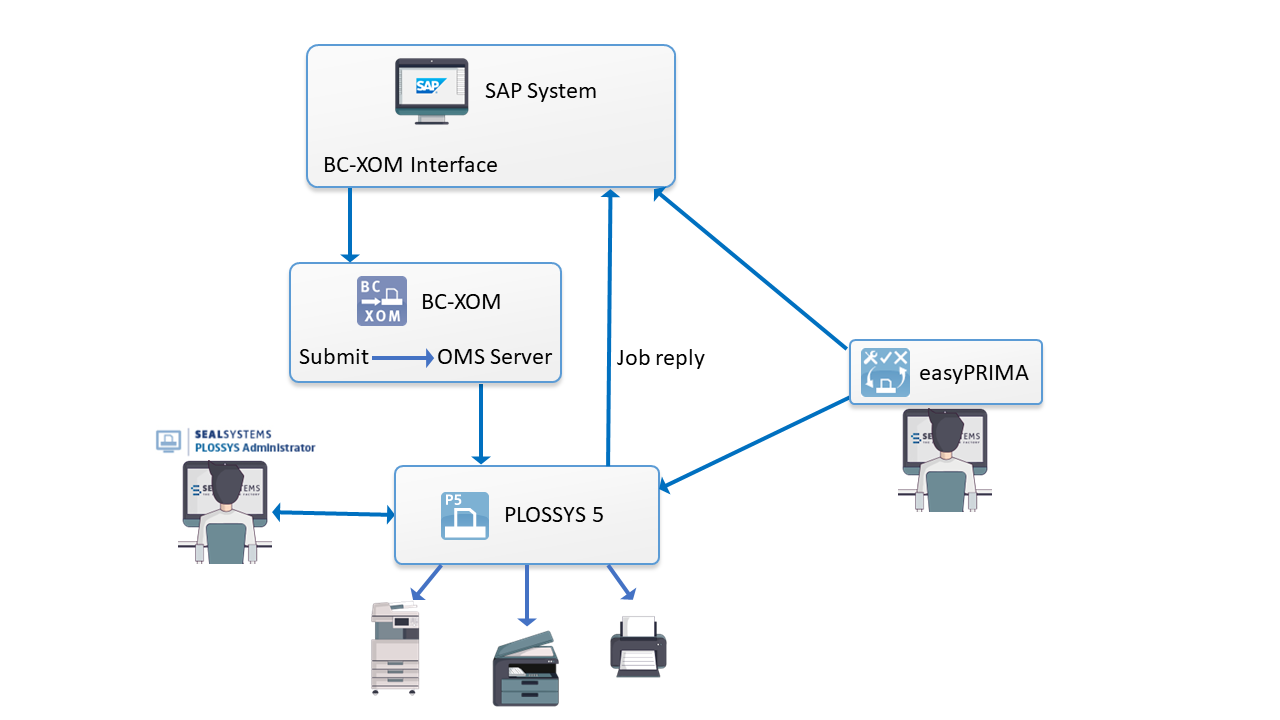
The printer is configured for BC-XOM in the SAP system. The BC-XOM interface from SEAL Systems accepts the job and transmits it via IPP or IPPS to the Output Engine server. PLOSSYS Output Engine processes the job and returns the job status to the SAP system via RFC callback.
Requirements on RHEL
If you use PLOSSYS Output Engine on RHEL prior to version 8 and you want to send replies to SAP, you have to install the /lib64/libstdc++.so.6 library explicitly. For more information, refer to https://launchpad.support.sap.com/#/notes/2338763.
Install SAP NetWeaver RFC
-
Open SAP Launchpad in a Web browser:
https://launchpad.support.sap.com/ -
Log on with your SAP user name and password.
-
In SAP Launchpad, search for the OSS number
2573790. -
Follow the download link for
SAP NW RFC SDK 7.50and save the current version. -
Extract the downloaded ZIP archive to the following directory:
/usr/local/nwrfcsdk
Configure SAP NetWeaver RFC
For the connection to SAP you can either connect to the SAP message server or a specific SAP application server. An application server executes the actual business logic. The message server is the distributor and load balancer for logons via RFC or SAP GUI.
If your SAP system has a message server, the configuration via message server is recommended.
Literature - sapnwrfc.ini
The sapnwrfc.ini file and its parameters is described in SAP Basis Configuration - Server, Configuration Files - Reference.
Application Server
-
Create
/etc/ld.so.conf.d/saprfc.confwith the following content:/usr/local/nwrfcsdk/lib -
Execute the following command:
sudo ldconfig -
Create the following directory unless it already exists:
sudo mkdir -p /opt/seal/etc -
If the connection to the SAP system is established via an application server, specify the SAP connections settings in the SAP configuration file
/opt/seal/etc/sapnwrfc.iniwherebySAPROUTERis set to/H/<name_saprouter>.Example - SAP configuration file
sapnwrfc.iniDEST=W74 ASHOST=10.100.100.100 TRACE=0 USER=sapuser PASSWD=encryptedsappassword CLIENT=310 SYSNR=01 SAPROUTER=/H/roeadm003.sealsystems.local LANG=ENPASSWDcan be either encrypted usingSECRETorSECRET_FILEor clear text. On how to encrypt passwords, refer to Secure the SAP Logon Data. -
Restart the following service:
seal-co-notifier
Message Server
-
Create
/etc/ld.so.conf.d/saprfc.confwith the following content:/usr/local/nwrfcsdk/lib -
Execute the following command:
sudo ldconfig -
Create the following directory unless it already exists:
sudo mkdir -p /opt/seal/etc -
Enter the connection data of the SAP system into
/opt/seal/etc/sapnwrfc.iniwherebySAPROUTERis set to/H/<name_saprouter>.Example - SAP configuration file
sapnwrfc.iniDEST=WMS R3NAME=W74 GROUP=PUBLIC MSHOST=10.100.100.100 CLIENT=000 USER=rfctest PASSWD=364de47d4d093ce8e7c65e244c08e7cb7fe2657e6cdd796a TRACE=0 SAPROUTER=/H/roeadm003.sealsystems.local LANG=ENMSSERVhas to be set additionally, if the server does not listen on the standard servicesapms<SYSNR>, or if this service is not defined in the services file and you need to specify the network port directly. -
Restart the following service:
seal-co-notifier
Configure BC-XOM in SAP
For the configuration in SAP, refer to OMS Interface for SAP (BC-XOM).
As of PLOSSYS Output Engine 7.0.0, OMS Interface for SAP (BC-XOM) 4.4.1 or newer is required. The OMS command for Submit has to be appended by the "&El" and "&Er" parameters, refer to chapter "Installation - SAP, Specify Commands" in the OMS Interface for SAP (BC-XOM) documentation.
Hint - supported
PLOSSYS Output Engine only supports oms_server or oms_submit and the transmission via IPP/IPPS.
Hint - troubleshooting
If no SAP notifications are being sent because of misconfiguration, refer to the troubleshooting section on how to fix it.
Configure the SAPGOF Converter on the Output Engine Server
Literature - SAPGOF Converter
For further information about how to configure the SAPGOF Converter, refer to the SAPGOF Converter documentation.
By default, the SAPGOF Converter uses the following configuration files:
-
/opt/seal/seal-convert-sapgof/lib/config/CONFIG -
/opt/seal/seal-convert-sapgof/lib/config/GRIBS74_PDF_DB
For using another configuration, specify the following Consul keys:
-
CONFIG: Customized content of theCONFIGconfiguration file -
GRIBS74_PDF_DB: Customized content of theGRIBS74_PDF_DBconfiguration file
Import the CONFIG File with PLOSSYS CLI
-
Copy
/opt/seal/seal-convert-sapgof/lib/config/CONFIGtoconfig_tmp.yml. -
Adjust
config_tmp.ymlaccording to the YAML format by indenting each line by four blanks and inserting the following lines at the beginning of the file:convert-sapgof: CONFIG:Hint - syntax
The data consists of multiple lines. For preserving the line endings, store the value in literal style, indicated by a
|. You have to indent all lines of the text. The leading spaces will not be part of the data retrieved by the service.Example - literal style
convert-sapgof: CONFIG: | This is a multiline value. -
Customize the settings in
config_tmp.ymland save the file. -
plossys config import config_tmp.yml` -
Restart the following service:
seal-convert-sapgof
Import the GRIBS74_PDF_DB File with PLOSSYS CLI
-
Copy
/opt/seal/seal-convert-sapgof/lib/config/GRIBS74_PDF_DBtogribs_tmp.yml. -
Adjust
gribs_tmp.ymlaccording to the YAML format by indenting each line by four blanks and inserting the following lines at the beginning of the file:convert-sapgof: GRIBS74_PDF_DB: -
Customize the settings in
gribs_tmp.ymland save the file. -
plossys config import gribs_tmp.yml -
Restart the following service:
seal-convert-sapgof
Advanced Configuration
The following keys influence the behavior of the output from SAP:
-
MAX_INSTANCES: Maximum of parallel conversions -
TIMEOUT: Time interval after which a conversion is aborted if it has not generated any new data
For how to configure the stamping of SAP output jobs, refer to Configure Stamps from SAP Output Jobs.
Literature - SAPGOF Converter
For further information about how to configure the SAPGOF Converter, refer to the SAPGOF Converter documentation.
Secure RFC Connection
On how to secure the RFC connection via SNC, refer to Secure Output from SAP Spool.