Update
For updating PLOSSYS Output Engine follow the steps below:
-
Check Preconditions and Requirements.
-
Execute version specific steps needed to be done before the respective update as described in the sections below. If no steps are listed continue with the next step.
-
Execute the steps to update the management server and Output Engine server separately.
-
Execute version specific steps needed to be done after the update as described in the sections below.
Hint
If a release has no update information, no special actions are needed for this specific release.
When skipping releases while updating, execute the update steps for the skipped releases too. For example, when updating from 5.7.0 to 6.1.0, the steps specified for 5.7.1 and 6.0.0 have to be executed as well.
Update to 7.2.0
As of PLOSSYS Output Engine 7.2.0, the environment key MONGO_UI_URL is introduced. It must be set if the default URL does not match. See After the Update (7.2.0)
After the Update (7.2.0)
-
With PLOSSYS Output Engine 7.2.0, the environment key MONGO_UI_URL must be set. This can be done automatically in most cases.
-
Start PLOSSYS Output Engine or at least
seal-consul-agentservice. -
Call the following command to automatically set MONGO_UI_URL:
plossys config validate --insecureCaution - cluster update
Do not use the
--purgeoption in this instance. Otherwise the not yet updated cluster nodes will not work anymore.Refer to Validate and Correct the Configuration of a Running System for more information.
-
-
PLOSSYS Administrator has been updated to Angular 20. The autocomplete filter does not accept wildcards anymore. Thus pre-existing autocomplete filters will be removed during the first start of PLOSSYS Administrator. All other filters and
Watchtabs are preserved.
Update to 7.1.0
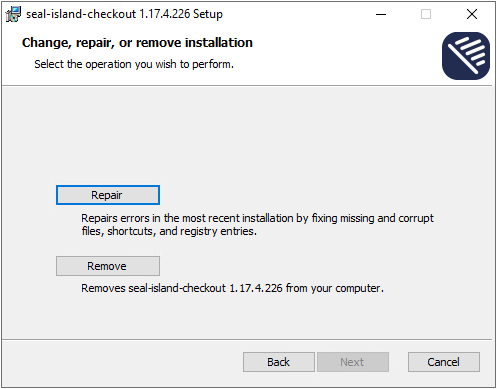
With PLOSSYS Output Engine 7.1.0, seal-island-checkout 1.28.0 is available for remote clients. It works as expected when using the Repair option and imports the changed configuration data into the Windows registry. You do not have to deinstall the prior version anymore. On how to update the remote client, refer to Update Remote Clients.
Update to 7.0.0
As of PLOSSYS Output Engine 7.0.0, OMS Interface for SAP (BC-XOM) 4.4.1 or newer is required. The OMS command for Submit has to be appended by the "&El" and "&Er" parameters, refer to chapter "Installation - SAP, Specify Commands" in the OMS Interface for SAP (BC-XOM) documentation.
Caution - misconfiguration
If the OMS command has not been appended, this can result in no SAP notifications being sent even after the error has been corrected. Check the troubleshooting section for instructions how to fix this.
As of PLOSSYS Output Engine 7.0.0, the environment key SAP_JOBNOTIFY_TIMEOUT is obsolet. Instead, you have to configure the timeout for every system in the spad transaction in SAP.
This is how you set it:
-
Open the
spadtransaction in SAP. -
Select
Full Administration>Output management systems. -
Use
Logical Output Management Systemsto display the SAP system you want to change. -
In the
OMS configurationtab, set the time interval forRestart After Failure of Callback Target.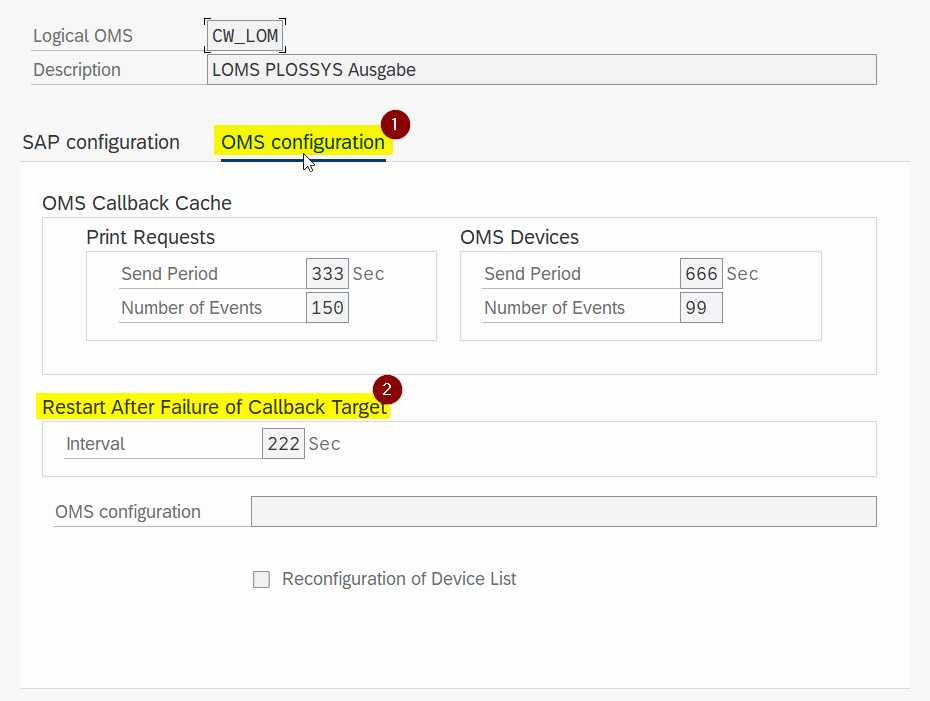
Update to 6.0.0
As of version 6.0.0, the following breaking changes occur:
-
PLOSSYS 5 has been renamed to PLOSSYS Output Engine. This also results in the renaming of services.
-
Node.js has been updated to version 20.11.1.
-
seal-logrotateis no longer included in the PLOSSYS Output Engine bundle. Logrotate cleans up outdated log files to free up storage space and prevent performance and memory issues. We strongly recommend to install SEAL Logrotate separately, either before or after the installation of PLOSSYS Output Engine. When running a cluster, this should be done on each server. For more information, refer to SEAL Logrotate documentation.
After the Update (6.0.0)
With PLOSSYS Output Engine 6.0.0, the services seal-plossys-accounting and seal-plossys-message-relay are renamed.
-
Start PLOSSYS Output Engine or at least
seal-consul-agentservice. -
Correct the service names in the Consul configuration with the following command:
plossys config validate --insecureCaution - cluster update
Do not use the
--purgeoption in this instance. Otherwise the not yet updated cluster nodes will not work anymore.Refer to Validate and Correct the Configuration of a Running System for more information.
-
Install SEAL Logrotate, refer to SEAL Logrotate documentation.
Update to 5.7.1
As of PLOSSYS 5 version 5.7.1, the seal-copier service will no longer stream files from the database but save them temporarily to the hard drive. In case of container installations, make sure that sufficient space is available.
Update to 5.6.0
After the Update (5.6.0)
If PLOSSYS Administrator can not be reached after the update, check the value of TLS_UNPROTECTED. For a cluster installation it has to be set to none. For a single server installation it needs to be loopback.
The following service keys used for IPP and SAP notifications are to be set for the seal-co-notifier instead of the seal-job-notifier service:
- SAP_JOBNOTIFY_TIMEOUT
- SAPNWRFCINI_PATH
- IPP_SYSTEMS
- IPP_NOTIFICATIONS_INTERVAL
- MONGO_NOTIFICATIONS_URL
- MONGO_LOCKS_URL
Update to 5.5.0
After the Update (5.5.0)
In rare cases no printers are visible in the printer view of the PLOSSYS Administrator after the update although they exist and still can be viewed via the PLOSSYS CLI command plossys printer show. In this case use the following workaround:
- Open the user settings dialogue.
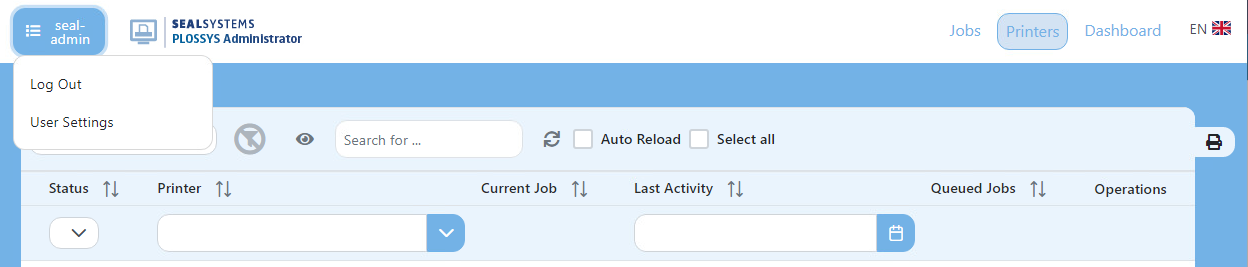
- Call
Reset all settingsto reset the view.
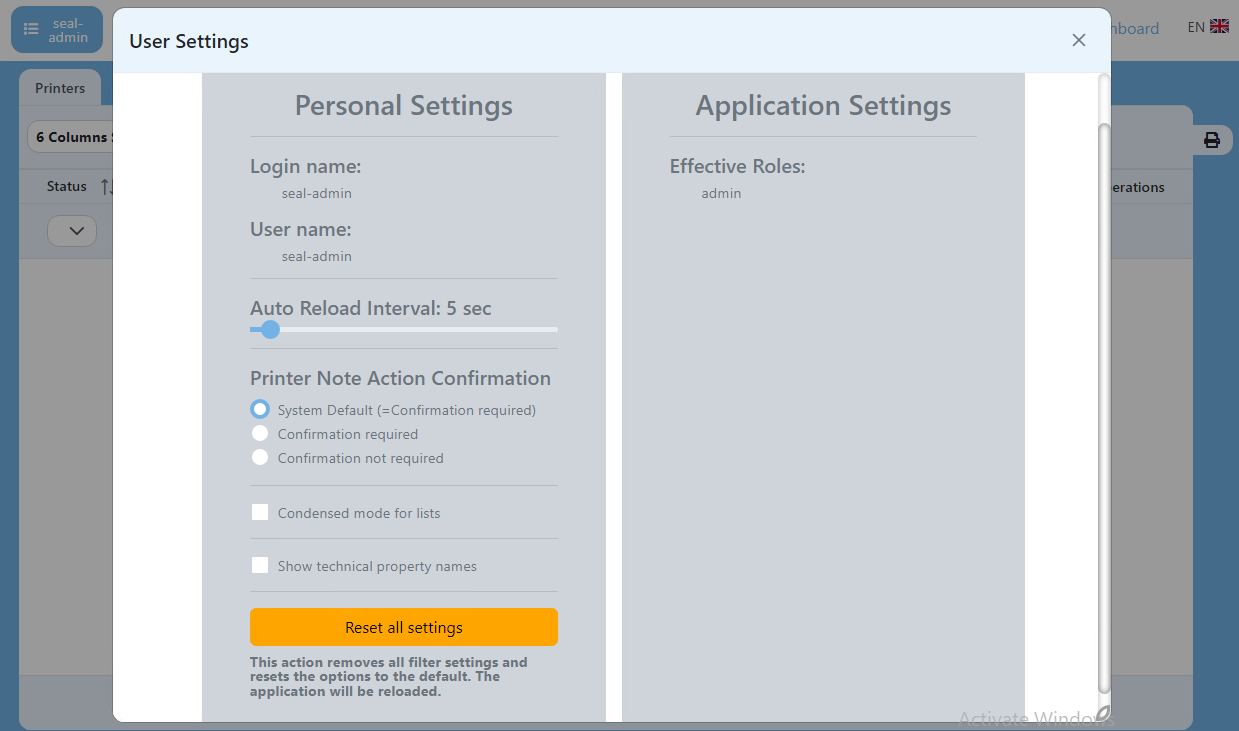
- Now all printers should be visible again. But the user's configuration will be lost and filters have to be set again.
Update to 5.4.0
Notes (5.4.0)
Version 5.4.0 of PLOSSYS 5 is a breaking change to previous versions. The SEAL NATS message broker has been introduced to improve the message handling and has to be installed before updating to PLOSSYS 5.4.0.
With PLOSSYS 5.4.0, the MongoDB service has been replaced by a newer incompatible version. Therefore, the data stored in MongoDB has to be exported before the update and imported again after the update. For how to do this, refer to the SEAL-specific MongoDB documentation.
Before the Update (5.4.0)
- Stop PLOSSYS 5 due to updating a running system will not work properly.
- Export the data stored in MongoDB, refer to the SEAL-specific MongoDB documentation.
- Update the MongoDB service to the version 4.4.4, refer to the SEAL-specific MongoDB documentation.
- Install the SEAL NATS message broker, refer to the SEAL NATS documentation.
After the Update (5.4.0)
- Start PLOSSYS 5.
- Import the MongoDB data exported before, refer to the SEAL-specific MongoDB documentation.
- Add the keys relevant for the
seal-plossys-message-relayservice which is the connection to SEAL NATS. The relevant key is at leastBROKER_SERVERS. - If you have customized
JOB_MAX_POSTPONED_COUNTforseal-controller, use the following steps to savely replace the old key with the new one: - Set the same value with
JOB_MAX_POSTPONED_COUNTforseal-convert-dispatcher. - Remove the
JOB_MAX_POSTPONED_COUNTkey forseal-controller.
Update to 5.3.5
Notes (5.3.5)
-
With PLOSSYS 5.3.5, the v2 REST routes have been deactivated. Now, only v3 with authentication is supported. For this, easyPRIMA as of version 1.7.0 or version 1.4.0 (development release only) is required. For easyPRIMA 1.3.1, a patch concerning the version change of the REST routes is available.
-
With PLOSSYS 5.3.5, the
JOBNAMEandUSERNAMEparameters are stored in the job asjobNameanduserName. A compatibility layer is active in the current version, but in a future PLOSSYS 5 version, it will be deactivated. In order that the job and user names are displayed correctly at the printer, which is important especially when using 3rd-party pickup printing systems or secure printing with a PIN, make sure you will soon update to printer templates from March 2022 or later.
After the Update (5.3.5)
PLOSSYS 5 versions previous to 5.3.5 opened the firewall ports automatically. However, as the older MSI packages are uninstalled during the update, Windows will automatically close those ports again during the update. Therefore, after updating to PLOSSYS 5.3.5, you have to open the ports with the script. For more information, refer to Open the Firewall Ports.
Update to 5.3.4
After the Update (5.3.4)
With PLOSSYS 5.3.4, the logs permission for viewing the log data of jobs and printers has been introduced in the roles configuration in ALLOWED_OIDC_CLIENTS. If you have solely ALL permissions configured ("permissions": ["ALL"]) nothing has to be done, but if you have explicit permissions configured, you have to add the logs permission in order to allow the users to still view job and printer logs.
Example - configuration with logs permission for jobs and printers
{
  "seal-plossysadmin": {
    "roles": {
      "superadmin": {
        "areas": {
          "jobs": {
            "set-xyz": {
              "views": ["ALL"],
              "permissions": ["tempfiles", "move", "pause", "cancel", "repeat", "resume", "delete", "collect", "logs"]
            }
          },
          "printers": {
            "set-xyz": {
              "views": ["ALL"],
              "permissions": ["add", "update", "pause", "redirect", "resume", "createTestJob", "checkPhysical", "logs"]
            }
          },
          "dashboard": {}
        }
      }
    }
  }
Update to 5.3.3
After the Update (5.3.3)
With PLOSSYS 5.3.3, audit data has been introduced. For this, the filebeat.yml configuration file has been changed. When updating to PLOSSYS 5.3.3, these changes have to be done manually.
-
Open the Filebeat configuration file on the Output Engine server:
C:\ProgramData\SEAL Systems\config\filebeat.yml -
Add the following entry below the
processorssection:- add_fields: when: has_fields: - metadata.audit target: "" fields: indextype: audit - rename: when: has_fields: - metadata.audit fields: - from: metadata.audit to: audit - from: application to: audit.application ignore_missing: true - copy_fields: when: has_fields: - audit fields: - from: timestamp to: audit.timestamp ignore_missing: true - drop_fields: when: has_fields: - audit fields: ["sourcefile", "hostname", "message", "application", "module", "level", "metadata", "agent", "host", "ecs", "processId"] ignore_missing: true
Update to 5.3.2
Before the Update (5.3.2)
With PLOSSYS 5.3.2, the MongoDB service has been replaced by a newer incompatible version. Therefore, the data stored in MongoDB has to be exported before the update and imported again after the update. For how to do this, refer to the SEAL-specific MongoDB documentation.
After the Update (5.3.2)
With PLOSSYS 5.3.2, the service evaluating PRINT_ERROR_SHEET changed from the seal-dispatcher to the seal-convert-dispatcher service. If you have customized PRINT_ERROR_SHEET for the seal-dispatcher service, customize it for the seal-convert-dispatcher service (or for any service).
In PLOSSYS 5.3.0 and with using the seal-dispatcher service, CONVERT_ON_PRINTER_START was evaluated by the seal-rest service, with the version 5.3.2, it is evaluated by the seal-controller service. If you have customized CONVERT_ON_PRINTER_START for the seal-rest service, customize it for the seal-controller service.
With PLOSSYS 5.3.2, the seal-dispatcher service has been replaced by other services and has to be removed manually after updating:
- Open the
Apps & Featuressystem dialog and uninstall theseal-dispatcherservice by selecting the service and clickingUninstallas described in After the Update (5.2.1).
With PLOSSYS 5.3.2, the MongoDB service has been replaced by a newer incompatible version. Therefore, the MongoDB data exported before updating has to be re-imported. For how to do this, refer to the SEAL-specific MongoDB documentation.
Ensure that all keys required for the cooperation with MongoDB have been specified correctly. For more information, refer to Configure the MongoDB Keys in PLOSSYS 5
With PLOSSYS 5.3.2, the dashboard of PLOSSYS Administrator has been secured. In order that the user can see the dashboard, the dashbord area has to be specified in the ALLOWED_OIDC_CLIENTS key. For more information, refer to ALLOWED_OIDC_CLIENTS.
Example - configuration with all views and all permissions
{
  "seal-plossysadmin": {
    "roles": {
      "superadmin": {
        "areas": {
            "jobs": {},
            "printers": {},
            "dashboard": {}
        },
        "set-all": {
            "views": ["ALL"],
            "permissions": ["ALL"]
        }
      }
    }
  }
Update to 5.3.0
Notes (5.3.0)
With version 5.3.0, PRINT_ERROR_SHEET does not work.
After the Update (5.3.0)
With PLOSSYS 5.3.0, the seal-controller service has been introduced which will replace the seal-dispatcher service in the next version. By default, the seal-dispatcher service is still used but you can already activate the seal-controller service by setting JOB_DISPATCHING to next.
When using the seal-controller service and if you have customized the service keys for seal-dispatcher in your PLOSSYS 5 installation before, you have to repeat the customization for seal-controller after the update:
-
If you have customized
JOB_MAX_POSTPONED_COUNTforseal-dispatcher, set the same value withJOB_MAX_POSTPONED_COUNTforseal-controller. -
If you have customized
LOUNGE_TTLforseal-dispatcher, set the same value withJOB_RETRY_DELAYforseal-controller.
Update to 5.2.1
Notes (5.2.1)
-
The Consul service has been replaced by a newer incompatible version. Therefore, the system configuration has to be exported before the update and imported again after the update.
-
In MongoDB, a shared replica set has to be configured for the cluster mode and the database has to be initialized for the single server mode. For how to do this, refer to the SEAL-specific MongoDB documentation.
-
Some services have been replaced by other services or have become obsolete and have to be removed manually after updating.
Before the Update (5.2.1)
With PLOSSYS 5.2.1, the Consul service has been replaced by a newer incompatible version. Therefore, the system configuration has to be exported before the update and imported again after the update.
-
Save the system configuration:
plossys config export <config_save_filename> -
Remove the Consul data directory:
C:\ProgramData\SEAL Systems\data\seal-consul
After the Update (5.2.1)
With PLOSSYS 5.2.1, the Consul service has been replaced by a newer incompatible version. The system configuration exported before updating has to be re-imported.
-
Import the system configuration exported before:
plossys config import <config_save_filename>
With PLOSSYS 5.2.1, the following services have been replaced by other services or have become obsolete and have to be removed manually after updating:
seal-pdf2psseal-pdfstampseal-ps2pdfseal-router-
seal-sapgof -
Open the
Apps & Featuressystem dialog and uninstall the services listed above one by one by selecting the service and clickingUninstall:
Update to 5.1.0
Notes (5.1.0)
-
With PLOSSYS 5.1.0, the directory structure of the installation has been changed. Therefore, it is required to execute some manual steps before and after the update.
-
When updating to PLOSSYS 5.1.0 and using easyPRIMA as of version 1.3.1, the
20181204_perl_soap-lite_1.27_part.zippackage has to be installed with easyPRIMA. Otherwise, the export from easyPRIMA to PLOSSYS 5 does not work and the500 SSL negotiation failederror message is output to the log file of easyPRIMA (edc.log).Hint - stop the system
Before installing the
20181204_perl_soap-lite_1.27_part.zippackage, stop the system and all Perl processes completely (sysstop -full). Otherwise, the Perl environment will break. -
Up to version 5.0.5, an error sheet was output in case of error. As of version 5.1.0, the error sheet is not output by default but can be activated by setting
PRINT_ERROR_SHEETtoY. ThePRINT_ERROR_SHEETenvironment variable is available as of version 5.1.0.
Before the Update (5.1.0)
With PLOSSYS 5.1.0, the directory structure of the installation has been changed. Therefore, it is required to execute some manual steps before and after the update.
-
Stop the Output Engine system completely:
plossys service stop --full -
In the Command Prompt (Administrator), copy the following directories to the new locations:
robocopy "%ProgramData%\SEAL Systems\plossys\config" "%ProgramData%\SEAL Systems\config" * /e /b /copyall /fp /ns /nc /np /nfl /ndlrobocopy "%ProgramData%\SEAL Systems\plossys\data" "%ProgramData%\SEAL Systems\data" * /e /b /copyall /fp /ns /nc /np /nfl /ndlCaution - access rights
Do not copy the directories via Windows Explorer. Use the
robocopycommand in the Command Prompt (Administrator) in order to retain the correct access rights. -
In the Command Prompt (Administrator), save the following configuration files:
rename "%ProgramData%\SEAL Systems\config\mongod.conf" mongod.conf.bak 2>NULrename "%ProgramData%\SEAL Systems\config\consul.json" consul.json.bak 2>NULrename "%ProgramData%\SEAL Systems\config\filebeat.yml" filebeat.yml.bak 2>NUL -
When using MongoDB in a cluster, you have to update MongoDB as described in the SEAL-specific MongoDB documentation.
After the Update (5.1.0)
With PLOSSYS 5.1.0, the directory structure of the installation has been changed. Therefore, it is required to execute some manual steps before and after the update.
-
Stop the Output Engine system completely:
plossys service stop --full -
In the Command Prompt (Administrator), adjust the following new configuration files according to the settings in the configuration files saved with the
.bakextension before the update:%ProgramData%\SEAL Systems\config\mongod.conf%ProgramData%\SEAL Systems\config\consul.json%ProgramData%\SEAL Systems\config\filebeat.yml
-
When running PLOSSYS 5 in a cluster, edit
%ProgramData%\SEAL Systems\config\mongod.confand insert the following line into thenetsection:bindIp: 0.0.0.0 -
In the Command Prompt (Administrator), remove the configuration files saved with the
.bakextension before the update and the previous installation directory:del /S /Q "%ProgramData%\SEAL Systems\config\mongod.conf.bak"del /S /Q "%ProgramData%\SEAL Systems\config\consul.json.bak"del /S /Q "%ProgramData%\SEAL Systems\config\filebeat.yml.bak"rmdir "%ProgramData%\SEAL Systems\PLOSSYS" -
Start the Output Engine system:
plossys service start
Update the Management Server
-
In a browser, log on to the SEAL Systems delivery platform with your logon data:
https://delivery.sealsystems.de
Hint - logon data
You receive the logon data from your Technical Project Manager at SEAL Systems.
-
For updating the server part of SEAL Elastic Stack, refer to the SEAL Elastic Stack documentation.
-
Download seal-bos2gyros-1.9.3.828.msi.
-
Install
seal-bos2gyros-1.9.3.828.msi. -
For updating easyPRIMA, refer to the easyPRIMA documentation.
Update the Output Engine Server
-
In the cluster mode, each Output Engine server has to be shut down gracefully before being updated.
-
In a browser, log on to the SEAL Systems delivery platform with your logon data:
https://delivery.sealsystems.de
Hint - logon data
You receive the logon data from your Technical Project Manager at SEAL Systems.
-
Download the PLOSSYS Output Engine - 7.3.3.2119 - msi folder. It is saved as
PLOSSYS Output Engine - 7.3.3.2119 - msi.zip. -
Extract the
PLOSSYS Output Engine - 7.3.3.2119 - msi.zipfile. -
Open a PowerShell (Administrator), change to the
PLOSSYS Output Engine - 7.3.3.2119 - msidirectory and start the installation of the packages:cd "PLOSSYS Output Engine - 7.3.3.2119 - msi"Set-ExecutionPolicy Bypass -Scope Process -Force; .\install.ps1Hint - specifying privileges explicitly
Unless you have specified the privileges for executing PowerShell scripts globally as described in the requirements for the Output Engine server, execute the installation script with the following command:
Set-ExecutionPolicy Bypass -Scope Process -Force; .\install.ps1 -
Start the Output Engine system:
plossys service start -
For updating the client part of SEAL Elastic Stack, refer to the SEAL Elastic Stack documentation.