Configure Remote Printing Using API Keys
To configure a remote site for printing, follow these steps:
- Create API keys.
- Configure the main site.
- Check out Optional Settings.
- Add the remote printer to PLOSSYS Output Engine.
- Install the remote site client.
Create API Keys
This is how you create API keyfiles with PLOSSYS CLI for remote sites:
-
Open a Command Prompt, Terminal or PowerShell.
-
Use the
plossys security createApiKeycommand to create API keys per remote site and save the output to a textfile. Use--islandsor--islandsFileto specify the names of the remote sites. In a container-based or cloud-based environment where no Consul is available, use the--localoption.Caution - possible data loss
You will need the output at the remote site. If you lose the API keys generated, they can not be recovered. We recommend to export the created API keys into files to prevent loss.
Examples
-
plossys security createApiKey --islands Alabasta,Krakoa --insecure --yaml > alabasta.txtCreates API keys for the remote sites
AlabastaandKrakoausing Consul and writes the output into the filealabasta.txt. -
plossys security createApiKey --islands Alabasta,Pucci --local --yamlCreates API keys for the remote sites
AlabastaandPucciwithout Consul and writes the output to STDOUT.
Literature - more information
For a detailed description of the command and its options and examples, refer to
Administrate Security. -
-
The output contains two sections. The section named with the remote site name holds the values needed to configure the client at the remote site. The section named
mainlandholds the values needed for configuration at the main site.Example - create an API key for Alabasta
> plossys security createApiKey Alabasta --insecure
✓ Successfully created the security codes for 'Alabasta'
✓ Auth Codes:
mainland:
DECRYPTION_SECRET: fe5cc40f0eb81b5423db4f12819ef5ad430901733b89e42f1144fa3e7f158f1a
CLIENTS: |
    {
        "Alabasta": {
            "IV": "2e3ae2d26fc2546e2721fe920b92f340",
            "ENCRYPTED_API_KEY": "9a4834f22c4c94d7bdd4b097034bf4e9829238c6f3df02a8a1b07b0e31d2a6969d78bb7aa5f63beb5203a4a4ec56b661"
        }
    }
islands:
    Alabasta:
        DECRYPTION_SECRET: a49920d726f07695c9e155f59e77f5776571c100332748bb43f47997f151ce48
        IV: db279a529e555f3134076ff6f22256ab
        API_KEY: 7f85efb950bf4c4c7e6060b8381bedbd49c0d7b41927a29b2d51b6b31ce2c43d
        ENCRYPTED_API_KEY: 144120bef81d0b3da77241141e4d0e2ea4f6dfb312843a1da28883b1e1edc2a08f342bb97951dc5c3f84a81350718986
Hint - new API key
To create new API keys for an existing remote site, you have to delete that site first. Refer to Delete a Remote Site.
-
If you have a Consul, check out the Optional Settings for
mainland-checkoutService.
Otherwise, continue with Configure the Main Site.
Configure the Main Site
On premise, if you have created the API keys wth PLOSSYS CLI as described above, remote sites created with PLOSSYS CLI have already been added to Consul. Continue with check the Optional Settings for mainland-checkout Service.
In all other cases, you have to add the respective keys DECRYPTION_SECRET and CLIENTS to Consul or the container orchestration.
-
The API keys generated for your remote sites contain a section
mainland. It contains all information needed to configure the main site.Example - API keys for the remote site Alabasta
The values needed for the configuration of the
mainland-checkoutservice are highlighted.mainland: DECRYPTION_SECRET: fe5cc40f0eb81b5423db4f12819ef5ad430901733b89e42f1144fa3e7f158f1a CLIENTS: | { "Alabasta": { "IV": "2e3ae2d26fc2546e2721fe920b92f340", "ENCRYPTED_API_KEY": "9a4834f22c4c94d7bdd4b097034bf4e9829238c6f3df02a8a1b07b0e31d2a6969d78bb7aa5f63beb5203a4a4ec56b661" } } islands: Alabasta: DECRYPTION_SECRET: a49920d726f07695c9e155f59e77f5776571c100332748bb43f47997f151ce48 IV: db279a529e555f3134076ff6f22256ab API_KEY: 7f85efb950bf4c4c7e6060b8381bedbd49c0d7b41927a29b2d51b6b31ce2c43d ENCRYPTED_API_KEY: 144120bef81d0b3da77241141e4d0e2ea4f6dfb312843a1da28883b1e1edc2a08f342bb97951dc5c3f84a81350718986 -
Create the following keys for the
mainland-checkoutservice:-
DECRYPTION_SECRETcontaining the mainlandDECRYPTION_SECRETvalue -
CLIENTSfor all remote sites in JSON format as shown in the mainlandCLIENTSvalueExample - JSON for two remote clients in
CLIENTS{ "Alabasta": { "IV": "9b88f00dadeae1d95e176a443b4bd776", "ENCRYPTED_API_KEY": "97453007f1916a5df60c1d1fed82bef8ea9900d62375ab665e87364ec3b7411b2712a03152499e0ca743c35e5967c48c" }, "Krakoa": { "IV": "3acab80470c32202e9d4ec661b0d7450", "ENCRYPTED_API_KEY": "bf0fb13e1003f03e9af96f40edccd169f11a06bc0687440aabac1cccb42f51642dd8776e3fc457eda78c5ecc34582371" } }
-
-
Continue with Optional Settings for
mainland-checkoutService
Optional Settings
-
Add optional keys for
mainland-checkoutservice as needed:AUTH_TYPE: authentication type, default:apiKeyISLAND_PORT: port the remote site clients can connect to, default:2119LOG_LEVEL: Log level for themainland-checkoutservice, default:infoLPR_ENCODING: encoding for LPR jobs, default:win1252MONGO_REMOTE_SITES_URL: database URL for the remote site connections, default:mongodb://localhost:27017/spooler-remote-sites
Hint - Consul paths
To create those keys you can use the full path as listed in the reference for each key or navigate through the Consul structure and create them at the needed level. If the path is not correct, the keys will not be evaluated.
-
Continue with Add the Remote Printer.
Add the Remote Printer
Creating a remote site printer is basically the same as creating a main site printer. The only difference is an additional key remoteSite.
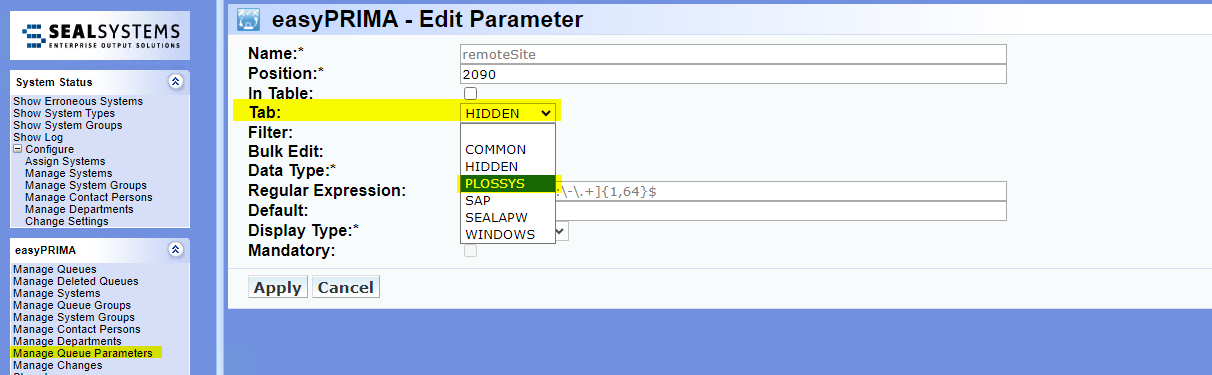
-
Move the queue parameter
remoteSitefrom theHIDDENto thePLOSSYStab.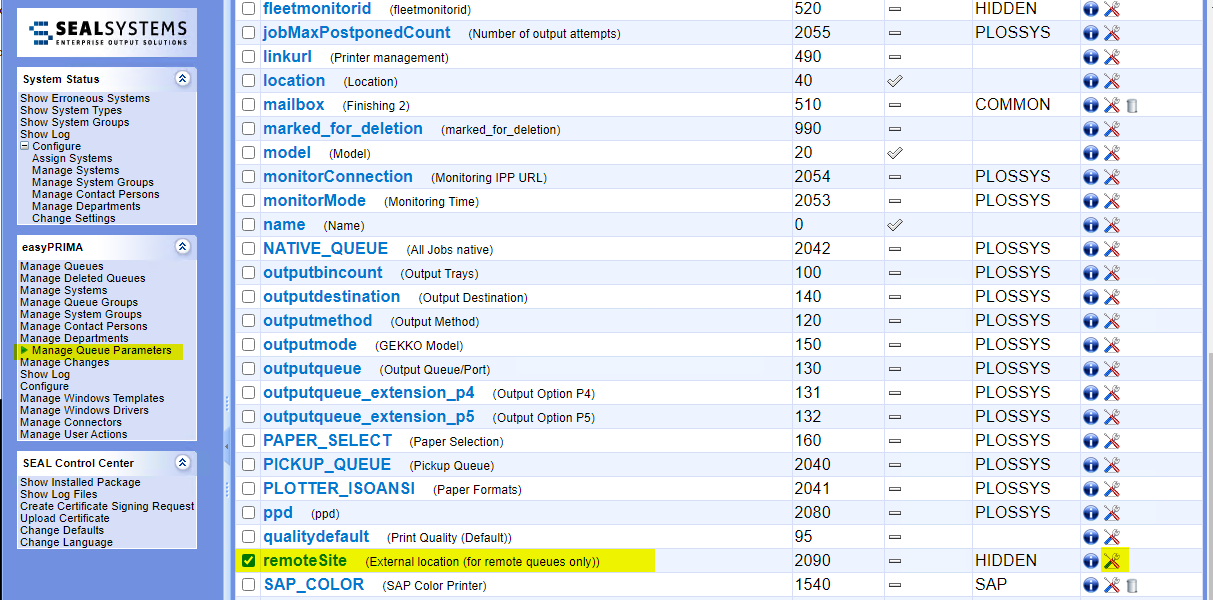
Literature - easyPRIMA documentation
As of version 1.10.1, easyPRIMA comes with a preconfigured
remoteSiteparameter for queues as described above. If you use an older version of easyPRIMA, add the parameter manually. For more information, refer to easyPRIMA, System Description, chapter 12 Queue Data, Add Customer-Specific Parameters. -
Create a queue for the remote printer in easyPRIMA.
-
In the
PLOSSYS Parameterstab, set the following parameters:Output Destination: IP address of the remote printer, for example192.168.178.39External location (for remote queues only): name of the remote site, for exampleAlabasta
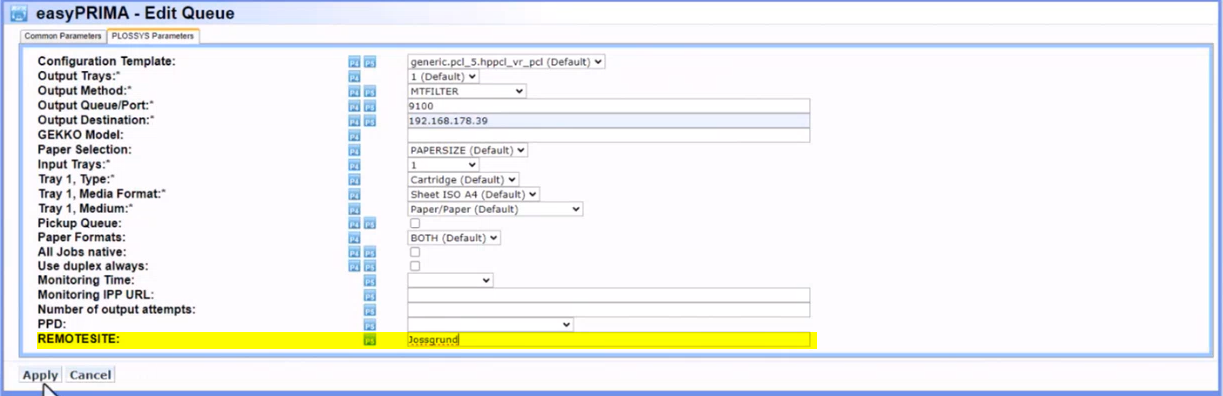
Hint - no typos
The name of the remote site has to be exactly the same as used to create the API keys and as specified in the mainland configuration.
-
Confirm with
Apply. -
Export the data to PLOSSYS Output Engine.
-
Continue with Install the Remote Site Client.


Install the Remote Site Client
The remote site installer provides the seal-island-checkout service and writes the connection details to the registry.
-
Keep the API keys generated for that remote site ready. You need them.
Example - API keys generated for the remote site Alabasta
The generated values needed for the configuration of the
seal-island-checkoutservice are highlighted.mainland: DECRYPTION_SECRET: fe5cc40f0eb81b5423db4f12819ef5ad430901733b89e42f1144fa3e7f158f1a CLIENTS: | { "Alabasta": { "IV": "2e3ae2d26fc2546e2721fe920b92f340", "ENCRYPTED_API_KEY": "9a4834f22c4c94d7bdd4b097034bf4e9829238c6f3df02a8a1b07b0e31d2a6969d78bb7aa5f63beb5203a4a4ec56b661" } } islands: Alabasta: DECRYPTION_SECRET: a49920d726f07695c9e155f59e77f5776571c100332748bb43f47997f151ce48 IV: db279a529e555f3134076ff6f22256ab API_KEY: 7f85efb950bf4c4c7e6060b8381bedbd49c0d7b41927a29b2d51b6b31ce2c43d ENCRYPTED_API_KEY: 144120bef81d0b3da77241141e4d0e2ea4f6dfb312843a1da28883b1e1edc2a08f342bb97951dc5c3f84a81350718986 -
Download the installation file for the
seal-island-checkoutfrom the SEAL Systems delivery platform onto the remote site client. -
Start the client installation:
-
Linux: If you have a YAML configuration file, save it as
/opt/seal/etc/seal-island-checkout.yml. Execute the installer.Example -
seal-island-checkout.ymlenv: SERVICE_URL: "http://localhost:3002" LOG_LEVEL: "debug" REMOTE_SITE: "Alabasta" MAINLAND_URLS: [MAINLAND_URLS] SERVICE_DISCOVERY: "cloud" TLS_UNPROTECTED: "world" DECRYPTION_SECRET: "a49920d726f07695c9e155f59e77f5776571c100332748bb43f47997f151ce48" IV: "db279a529e555f3134076ff6f22256ab" ENCRYPTED_API_KEY: "144120bef81d0b3da77241141e4d0e2ea4f6dfb312843a1da28883b1e1edc2a08f342bb97951dc5c3f84a81350718986" -
Windows: If you have a preconfigured *.mst file for the remote site, open a command line and execute the following command to start the installer:
/i seal-island-checkout seal-island-checkout-x.x.x.x.msi TRANSFORMS=<island_configuration>.mstOtherwise start the installer by double-clicking it.
-
-
Enter the connection data:
API Key: Encrypted API key for the remote siteIV: IV for the remote siteSecret: decryption secret for the remote siteUrls: URL of the Output Engine system, accessible from the outsideRemote Site: name of the remote site as used to create the API key
If you used a configuration file, you only have to enter the
Secret.Hint -no typos
The name of the remote site has to be exactly the same as used to create the API keys and as specified in the mainland configuration.
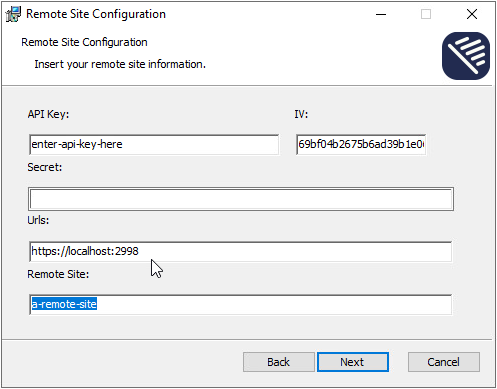
-
Confirm with
Nextand start the installation withInstall.Hint - registry
The Windows installer stores the connection data in the registry at
Computer\HKEY_LOCAL_MACHINE\SOFTWARE\SEAL Systems\seal-island-checkout. Note, it does not store the API key but the encrypted version of it.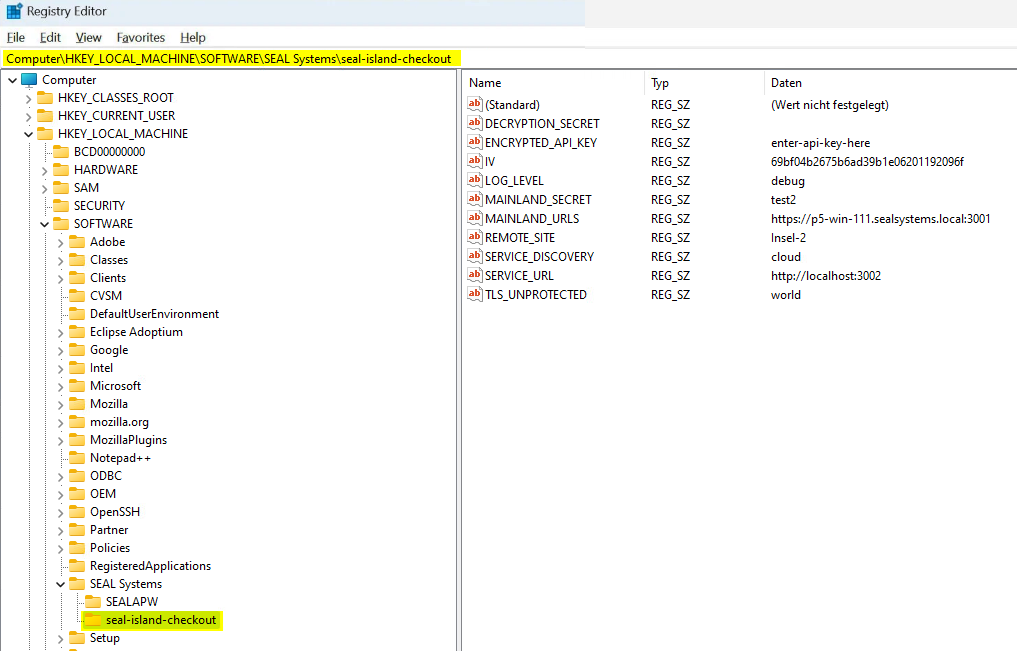
-
To test the connection, click
Open Monitorafter the installation is finished or callhttps://localhost:3002in your browser.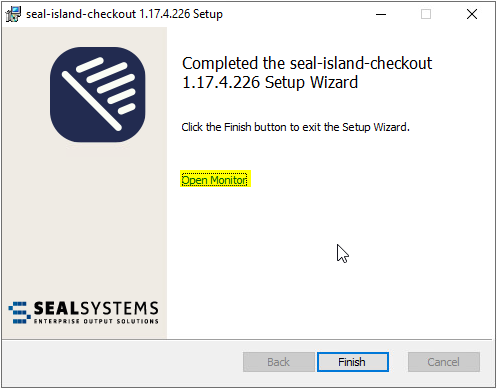

Modify the Remote Site Configuration
-
Execute the installer for the
seal-island-checkoutagain. -
Select
Repair.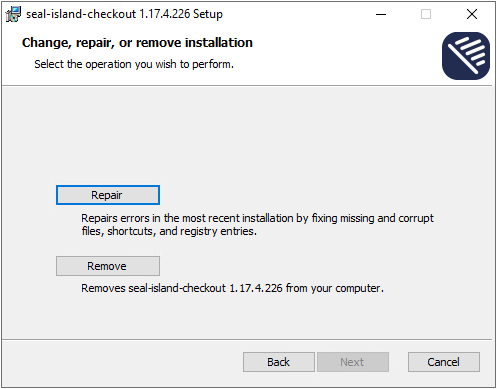
Hint - Windows client
When changing the
seal-island-checkouton a Windows client using theRepairoption, default values will be written into the registry instead of the changed data. To prevent that issue, uninstall the current client first, then install anew.
Delete a Remote Site
There are several ways how to delete a remote site:
-
Uninstall the
seal-island-checkoutat the client. -
Edit the
CLIENTSkey and delete the entry for that site from the JSON value. -
Delete the remote printer in easyPRIMA or change its
remoteSiteparameter.