Secure Output from SAP Spool
SNC (Secure Network Communications) can be used to protect the communication via RFC. Additionally, SSO (single sign-on) can be activated for RFC communication, which allows logon via certificate instead of password. The connection establishment and the communication via SNC is about 5 - 10 % slower than the uncoded variant.
To secure the BC-XOM connection, follow all the instructions below.
Literature
Refer to SAP Basis Configuration - SNC/SSO and RFC for additional information.
Requirements
- PLOSSYS Output Engine as of 7.2.0
- BC-XOM as of 4.9.0 configured, refer to Configure Output from SAP Spool for Windows or Linux
-
SAP Cryptographic Library installed on SAP server and downloaded onto Output Engine server
Hint - SAP Cryptographic Library
SAP Cryptographic Library is available via the SAP Service Marketplace. The installation package
SAPCRYPTO.SARcontainssapcrypto.dllfor Windowslibsapcrypto.sofor UNIX- configuration tool
sapgenpse.exefor Windows and Linux sapcrypto.mfwith information about supported platforms and kernels
Create PSE for SNC and Certificate
This is how you create the PSE (Personal Security Environment) for SNC on the SEAL server with certificate request:
-
On the Output Engine open a PowerShell (Windows) or Terminal (Linux).
-
Create the
SECUDIRdirectory if it does not exist yet:-
Windows:
C:\ProgramData\SEAL Systems\config\sec -
Linux:
/opt/seal/etc/sec
Caution - pre-existing directory
If the directory already exists, move or delete old PSE files from the directory to prevent undesired effects.
-
-
Install the SAP Cryptographic Library to the
SECUDIRdirectory. -
Create the following system environment variables for the
sapgenpseconfiguration tool:-
SECUDIR- Windows:
C:\ProgramData\SEAL Systems\config\sec - Linux:
/opt/seal/etc/sec
- Windows:
-
SNC_LIB_64- Windows:
C:\ProgramData\SEAL Systems\config\sec\sapcrypto.dll - Linux:
/usr/local/sap/sec/libsapcrypto.so
- Windows:
Example - setting Windows environment variables in PowerShell
$env:SECUDIR='C:\ProgramData\SEAL Systems\config\sec' $env:SNC_LIB_64='C:\ProgramData\SEAL Systems\config\sec\sapcrypto.dll' -
-
When working on Linux, the user
sealand the user performing the administration for the SEAL Systems software require read/write/execute permissions on the directories defined bySECUDIRandSNC_LIB_64. -
Create the PSE with certificate request.
sapgenpse.exe gen_pse -p SEALRFC.pse -x <PIN> -r SEALRFC.csr "CN=SEALRFC, OU=<Department>, O=<Company> C=DE"Example - SEAL Systems
sapgenpse.exe gen_pse -p SEALRFC.pse -x <PIN>-r SEALRFC.csr "CN=SEALRFC, OU=SEALSAP, O=SEAL, C=DE“Hint - CN name
If a certificate is not yet available, the
CN name(Common Name) for the secured RFC connection must first be clarified. There may be specifications that the computer name or the system user must be included in the name. If there are no specifications, the following recommendation applies to all SEAL servers:CN=SEALRFCCaution - PIN
A PIN may be entered for the creation. Remember the PIN for further configuration.
Provide Certificate
This section describes how to create a self-signed certificate from the SAP system.
Hint - alternative
You can also use the signed certificate of a regular certificate authority. The client's certification authority receives the certificate request from Create PSE (Personal Security Environment) for SNC and Certificate.
A separate certificate must be provided as a file in X.509-Base64 format for each member of the certificate chain (CA and SubCAs). Alternatively, a certificate bundle *.p7b with all certificates of the certificate chain can be provided.
Store the certificates in the SECUDIR directory.
This is how you provide a self-signed certificate from the SAP system:
-
On the SAP system, start the transaction
strust. -
On the left, double-click the respective SAP server under
SNC SAPCryptolib. -
On the right, double-click the subject under
Own Certificate. Do not select a subject in theCertificate List. -
Click
at the bottom to export the certificate and save the certificate in
Base64format. -
Copy the certificate to the
SECUDIRon the Output Engine server. -
To check the certificate, double-click it in Explorer. In the certificate display, switch to the
Certification Pathtab and check theCertificate statuson the bottom.
Import the SAP Certificate to PSE
-
Open the
SECUDIRin a PowerShell (Windows) or Terminal (Linux).- Windows:
cd "C:\ProgramData\SEAL Systems\config\sec" - Linux:
cd /opt/seal/etc/sec
- Windows:
-
Include the SNC SAPCryptolib certificate in the PSE:
sapgenpse.exe maintain_pk -p SEALRFC.pse -x <PIN> -a <Certificate>.crt<Certificate>.crtis the certificate which you exported from SAP in the previous section.Hint - signed certificate from a certification authority
Import the response to the certification request with:
sapgenpse.exe -log import_own_crt -p SEALRFC.pse -c <RequestAnswerFile>.crt [-r <CACertificateFile>.crt]If
<RequestResponseFile.crt>does not contain the root certificate, the root certificate and all certificates of the intermediate certification authority must be specified individually with the-roption.You import a certificate bundle with:
sapgenpse.exe -log import_own_crt -p SEALRFC.pse -c <Certificatebundlefile.p7b> -
Export the public key for the upload to SAP:
sapgenpse.exe export_own_cert -p SEALRFC.pse -x <Code> -o sealrfc.crtHint - signed certificate of a regular certificate authority
If a signed certificate from a regular certification authority is provided, the certificate for the RFC programs only needs to be exported if you use the logon via certificate.
-
On the SAP system, start the transaction
strust. -
On the left, double-click the SAP server under
SNC SAPCryptolib. -
On the bottom of the right side, click
Import Certificate. Then select the certificate from the previous stepsealrfc.crtand confirm viaAdd to Certificate List.Hint - distribution to other SEAL servers
A PSE which is created for the RFC programs may be distributed to other SEAL Systems servers by copying the following files:
-
SEALRFC.pse -
*.crt -
ticket(optionally depending on the version of the SAP Cryptographic Library)
-
Create Server Credentials
Server credentials must be created for the system user and the service user. The server credentials ensure that the user is authorized to use the private key (PSE).
This is how you create the server credentials:
-
On the Output Engine server, open the
SECUDIRin a PowerShell (Windows) or Terminal (Linux).- Windows:
cd "C:\ProgramData\SEAL Systems\config\sec" - Linux:
cd /opt/seal/etc/sec
- Windows:
-
Create server credentials for the following users:
-
Logged-on system user used for administration
sapgenpse.exe seclogin -p SEALRFC.pse -x <Code> -
Service user, e.g.
LocalService(Windows) resp.seal(Linux)sapgenpse.exe seclogin -p SEALRFC.pse -x <PIN> -O <ServiceUser>
Hint - control
Display the server credentials for checking with:
sapgenpse.exe seclogin -p SEALRFC.pse -x <PIN> -lCheck the item in the PSE with:
sapgenpse.exe get_my_name -p SEALRFC.pse -x <PIN>Hint - no distribution
Contrary to PSE, the
cred_v2file must not be copied and must be created anew on each server. -
Configure SAP NetWeaver RFC
-
On the Output Engine server, edit
sapnwrfc.ini:C:\ProgramData\SEAL Systems\config\sapnwrfc.ini -
For the RFC destinations for which you want to activate SNC, enter:
SNC_MODE=1Protects the RFC communication via SNCSNC_MYNAME=p:DistinguishedNameSNC name for PLOSSYS Output EngineSNC_SSO=0optional, only necessary when logging on with user and password instead of SSO, refer to Activate SSOSNC_QOPoptional, quality of protection, default:3
Example
SNC_MODE=1
SNC_MYNAME=p:CN=SEALRFC, OU=SEALSAP, O=SEAL, C=DE
SNC_QOP=3
Configure seal-co-notifier Service
-
Create the following environment keys for
seal-co-notifierservice:SECUDIR:SECUDIRdirectory used to storage PSE- Windows:
C:\ProgramData\SEAL Systems\config\sec - Linux:
/opt/seal/etc/sec
- Windows:
SNC_LIB_64: path to the SAP Cryptographic Library- Windows:
C:\ProgramData\SEAL Systems\config\sec\sapcrypto.dll - Linux:
/usr/local/sap/sec/libsapcrypto.so
- Windows:
Example - setting the keys with PLOSSYS CLI under Windows
plossys config set SNC_LIB_64 "C:\ProgramData\SEAL Systems\config\sec\sapcrypto.dll" --service co-notifier --insecure
plossys config set SECUDIR "C:\ProgramData\SEAL Systems\config\sec" --service co-notifier --insecure
Example - setting the keys with PLOSSYS CLI under Linux
plossys config set SNC_LIB_64 "/usr/local/sap/sec/libsapcrypto.so" --service co-notifier --insecure plossys config set SECUDIR "/opt/seal/etc/sec" --service co-notifier --insecure -
Restart
seal-co-notifierservice.
Activate SNC on the SAP System
- In SAP, start the transaction
sm59and select the RFC destination for which you want to specify SNC. - Switch to the
Logon & Securitytab. - In
Security OptionsunderStatus of Secure Protocol, click theSNCbutton. -
Enter the certification partner under SNC at
Partnersand save the settings. The partner name must match theSNC_MYNAMEspecified insapnwrfc.inion the Output Engine server und starts withp:.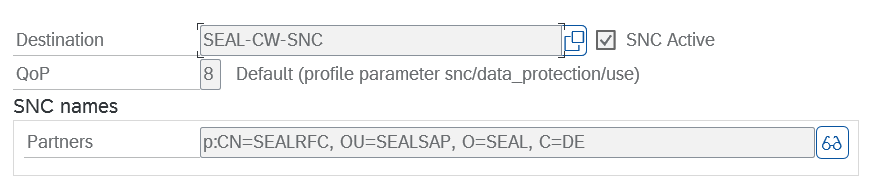
Hint - quality of protection
You may use
QoPin order to specify the quality of protection. The default setting is3. The value must match the configuration in thesapnwrfc.inion the Output Engine server. -
Activate SNC with the saved settings by clicking
Activate. -
To test the RFC connection, click
Connection Teston the top of the page.
Activate SSO (Single Sign On)
This section is optional and only needed if you want to activate SSO instead of login via username and password.
-
On the Output Engine server, edit
sapnwrfc.iniand specify the following parameters for the RFC destination:PASSWD=CERTThe password evaluation recognizes SSO, ifCERTis set as an identifier.SNC_SSO=1optional, when set to0SSO is deactivated
-
In SAP, start the transaction
su01. Use the system user specified insapnwrfc.ini. -
Switch to the
SNCtab and enter the SNC data:SNC-NAMESNC name as specified insapnwrfc.inibeginning with the prefixp:.Permit Password Logon for SAP GUI: Deactivate